Decoupage tutoriali |
Odgovori 
|
Stranica 123> |
| Korisnik | |||
iris 
Neukroćena biljka 

Pridružen: 18 Veljača 2008 Lokacija: . Status: Offline Bodovi: 4502 |
 Opcije poruke Opcije poruke
") Hvala(0) Hvala(0)
 Citiranje Odgovor Citiranje Odgovor
 Tema: Decoupage tutoriali Tema: Decoupage tutorialiObjavljeno: 29 Siječanj 2009 u 10:45 |
||
|
u ovu temu idu samo free tutoriali bez komentara zbog preglednosti i lakšeg snalaženja
komentari ako ih bude će biti obrisani
možete stavljati linkove ili slike sa uputstvima sa interneta ali pripazite da se radi o besplatnim stvarima
da još jednom naglasim:
-bez komentara
-tutoriali sa objašnjenjima kako nešto napraviti u decouage tehnici a ne slike lijepih radova
ako nekome još nešto treba pojasniti neka mi pošalje pp
|
|||
 |
|||
| Sponzorirani linkovi | |||
|
|||
|
monna-1
Trajnica

Pridružen: 18 Travanj 2008 Lokacija: Croatia Status: Offline Bodovi: 2598 |
Opcije poruke
Hvala(0)
Citiranje Odgovor
Objavljeno: 29 Siječanj 2009 u 11:01 |
||
|
|||
|
monna-1
Trajnica
Pridružen: 18 Travanj 2008 Lokacija: Croatia Status: Offline Bodovi: 2598 |
Opcije poruke
Hvala(0)
Citiranje Odgovor
Objavljeno: 29 Siječanj 2009 u 11:47 |
||
Decoupage plate
Decorative plates, made of everything from antique china to painted pottery, are a popular decorating accessory. Kitty Bartholomew, host of HGTV's Kitty Bartholomew: You're Home, meets with artist Joan Justeson to get a quick lesson in inexpensively personalizing a plain glass plate with decoupage and paint. The result is an impressive Asian-style plate that looks like a fine antique.
Materials:
preuzeto sa: www.diynetwork.com
|
|||
|
|||
|
monna-1
Trajnica
Pridružen: 18 Travanj 2008 Lokacija: Croatia Status: Offline Bodovi: 2598 |
Opcije poruke
Hvala(0)
Citiranje Odgovor
Objavljeno: 29 Siječanj 2009 u 11:53 |
||
|
Decoupage stools
Decoupage is still very popular, and many catalogs feature wooden stools with decoupaged seats. Susan Schultz, designer and artist with Backstreet Inc., shows a decoupaged vegetable motif applied to the seat of a wooden stool. Materials:
|
|||
|
|||
|
monna-1
Trajnica
Pridružen: 18 Travanj 2008 Lokacija: Croatia Status: Offline Bodovi: 2598 |
Opcije poruke
Hvala(0)
Citiranje Odgovor
Objavljeno: 29 Siječanj 2009 u 12:00 |
||
|
Decoupage desk
Sheila McGraw, author of Painting and Decorating Furniture, Firefly Books, 1997, adds new life to an old desk by creating a unique look with decoupage and scrap papers.
Materials:
|
|||
|
|||
|
monna-1
Trajnica
Pridružen: 18 Travanj 2008 Lokacija: Croatia Status: Offline Bodovi: 2598 |
Opcije poruke
Hvala(0)
Citiranje Odgovor
Objavljeno: 29 Siječanj 2009 u 12:05 |
||
|
Decoupage dresser
Nothing is easier or more fun than decoupage to change the look of a piece of furniture (or a mirror, a lampshade, a cardboard box or just about anything you can think of). Simply cut out favorite images, glue them to the surface, and apply a protective sealer. DIY Decorating & Design host Nancy Golden gives an old dresser a new look by decoupaging Thai mango paper to the front of the drawers. Materials: Wooden dresser
Preuzeto sa: www.diynetwork.com
|
|||
|
|||
|
monna-1
Trajnica
Pridružen: 18 Travanj 2008 Lokacija: Croatia Status: Offline Bodovi: 2598 |
Opcije poruke
Hvala(0)
Citiranje Odgovor
Objavljeno: 29 Siječanj 2009 u 12:08 |
||
|
Decoupage votives candleholders
Materials: Clear, smooth glass votive Note: Tissue paper also comes in patterns (figure A).
preuzeto sa:www.diynetwork.com |
|||
|
|||
|
monna-1
Trajnica
Pridružen: 18 Travanj 2008 Lokacija: Croatia Status: Offline Bodovi: 2598 |
Opcije poruke
Hvala(0)
Citiranje Odgovor
Objavljeno: 29 Siječanj 2009 u 12:29 |
||
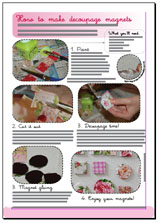
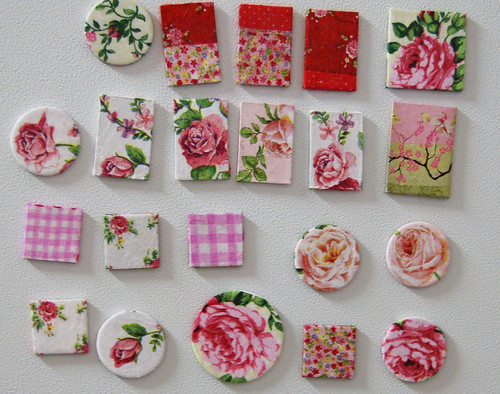
Free tutorial: how to make decoupage magnets (pdf)Mar 12th, 2008 by iHanna
At my journalistic education we worked with Macs and did magazine layout in Quark Express. I’ve installed Adobe’s layout program InDesign because I want to know it too. While trying it out I did a tutorial on how to create decoupaged chipboard magnets! I saved it in PDF-format so that you all can have a look! It’s free for you to download and print. I hope you like it. I had fun making it, but I wish my designing skills were better. But if anyone enjoys this I might do more tutorials in the future and maybe improve my layout skills a bit. Here is an image of my finished magnets in shabby chic style:
If you want to bookmark the tutorial please link to this post, thank you! Free PDF: download the tutorial! preuzeto sa: ihanna.nu/blog
|
|||
|
|||
|
monna-1
Trajnica
Pridružen: 18 Travanj 2008 Lokacija: Croatia Status: Offline Bodovi: 2598 |
Opcije poruke
Hvala(0)
Citiranje Odgovor
Objavljeno: 10 Veljača 2009 u 18:43 |
||
How to decoupage with Mod Podge
 |
|||
|
|||
|
monna-1
Trajnica
Pridružen: 18 Travanj 2008 Lokacija: Croatia Status: Offline Bodovi: 2598 |
Opcije poruke
Hvala(0)
Citiranje Odgovor
Objavljeno: 11 Veljača 2009 u 20:56 |
||
Tropical Flower TutorialPosted by Ari Farber
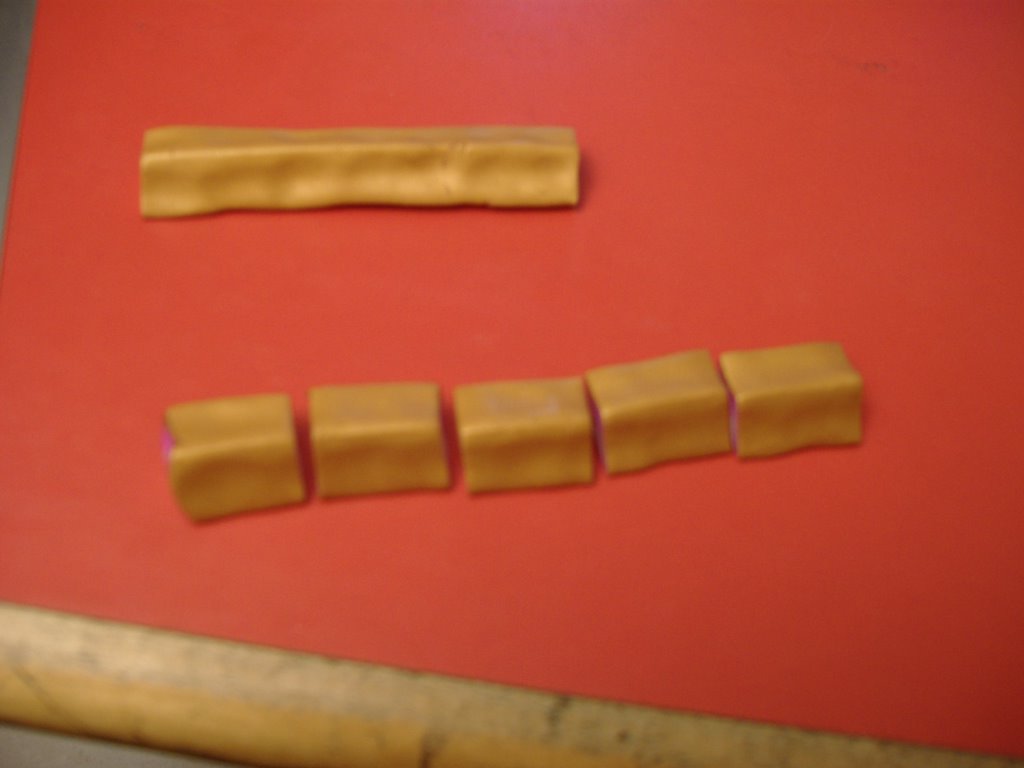
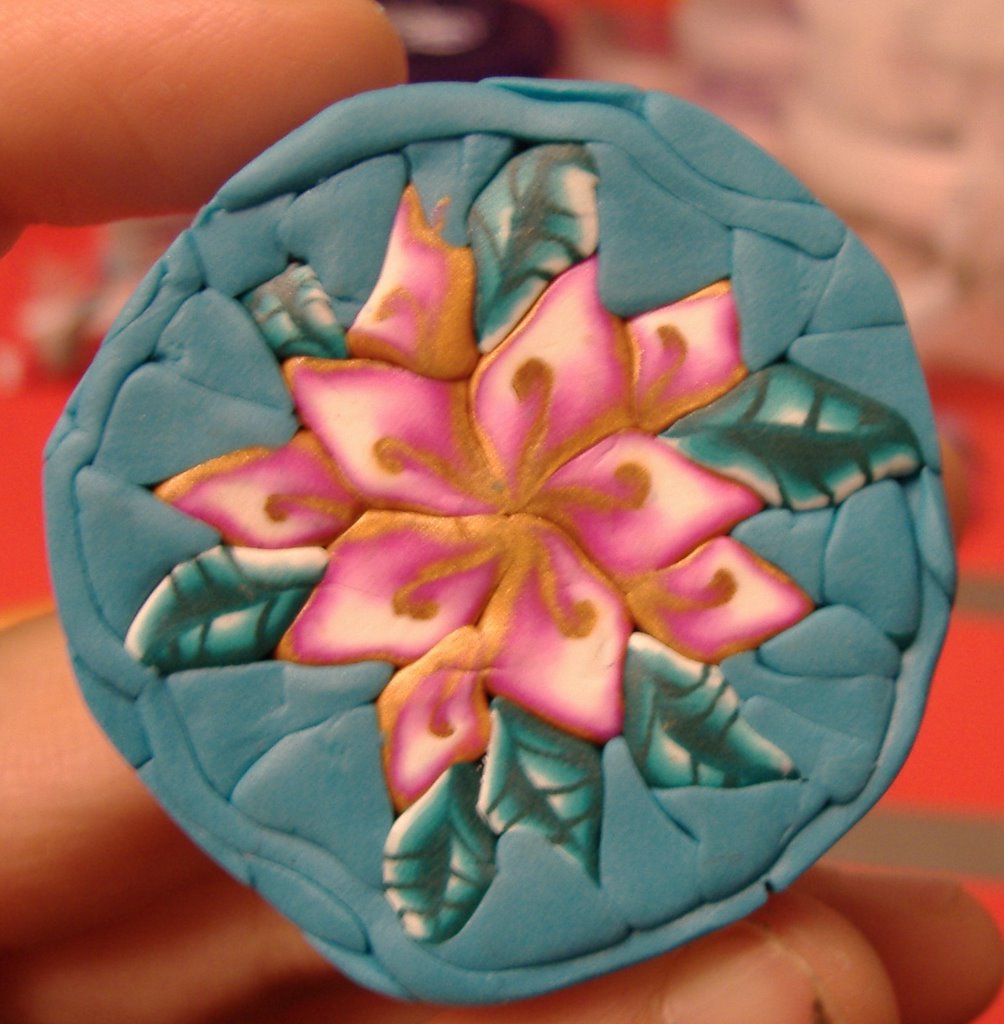
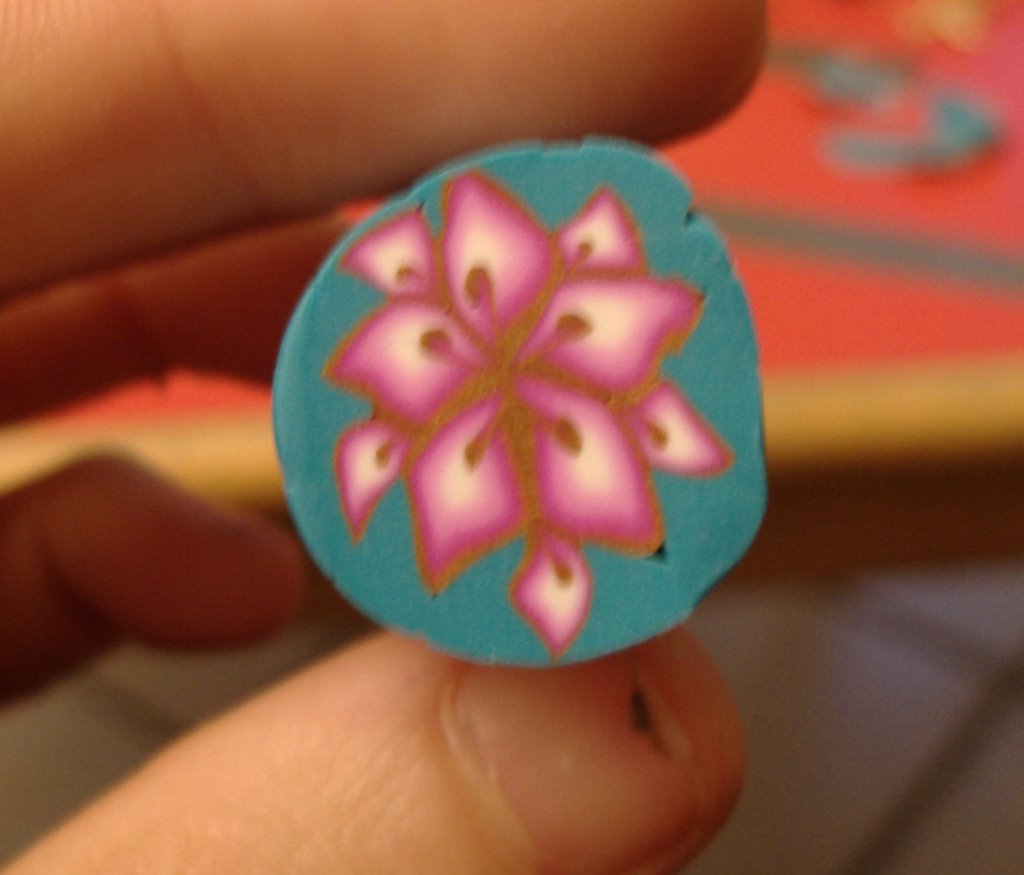
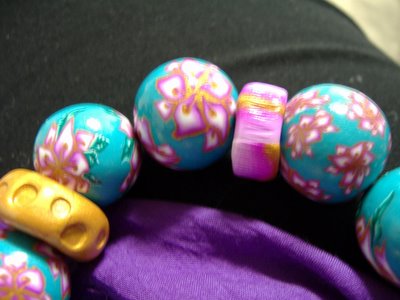
by: Ari farber the type of clay i used is fimo soft. 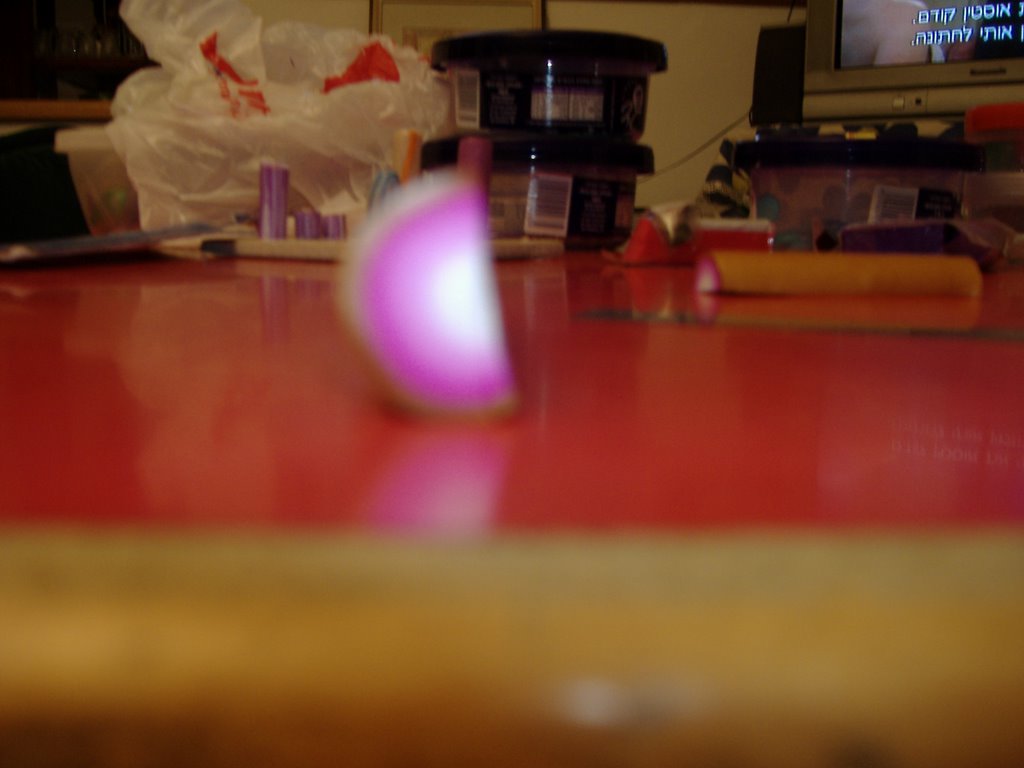 you take a bullseye blended cane.  and you cut it in helf, lenght ways. you put it on a flat surface and you flatten it on 1 side, through its entire length.  you keep doing it untill yougrt this result  you pick up the clay and start rolling it on itself. .  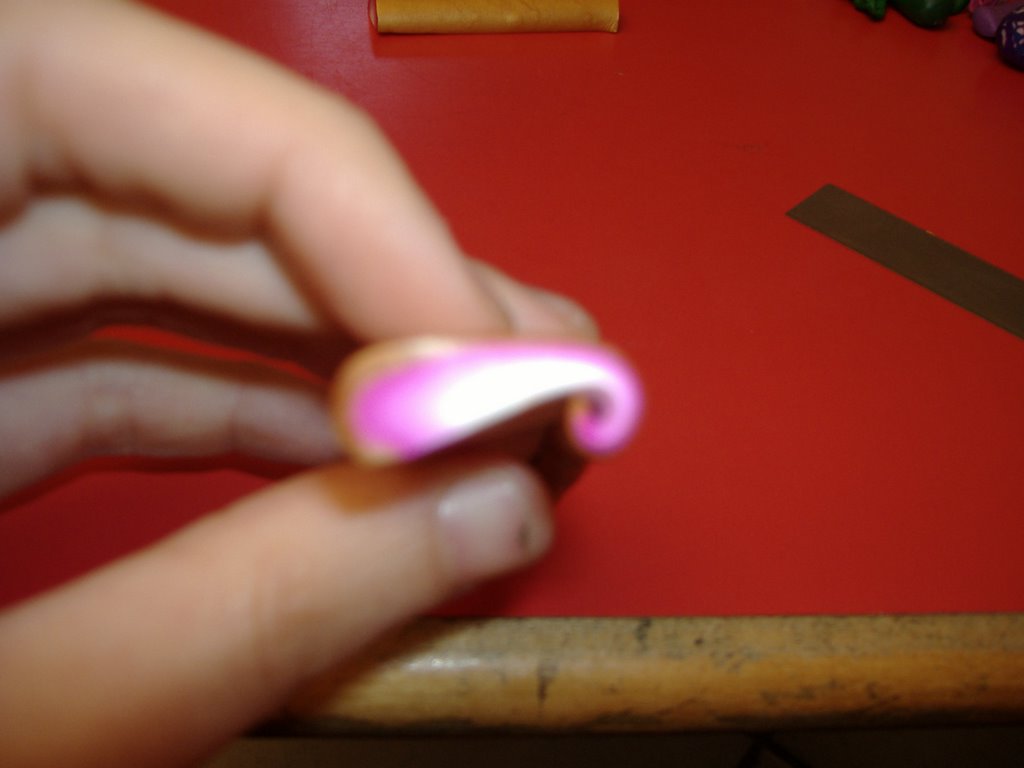  then you put it back on the table and start pushing the edges together to close it. . 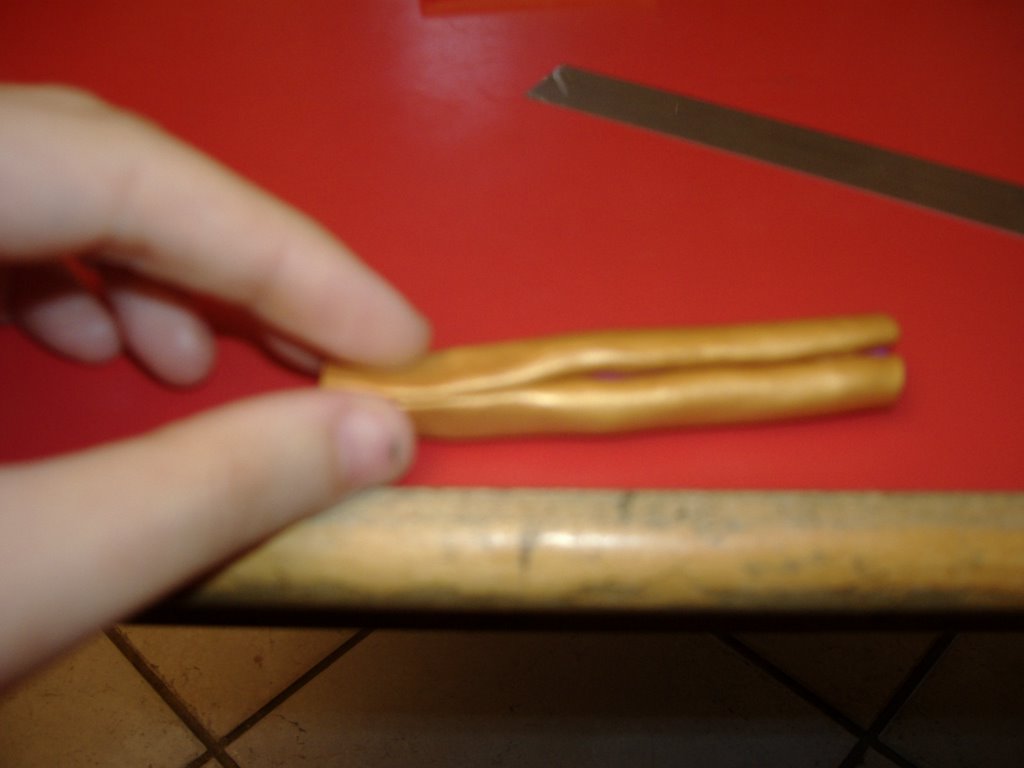 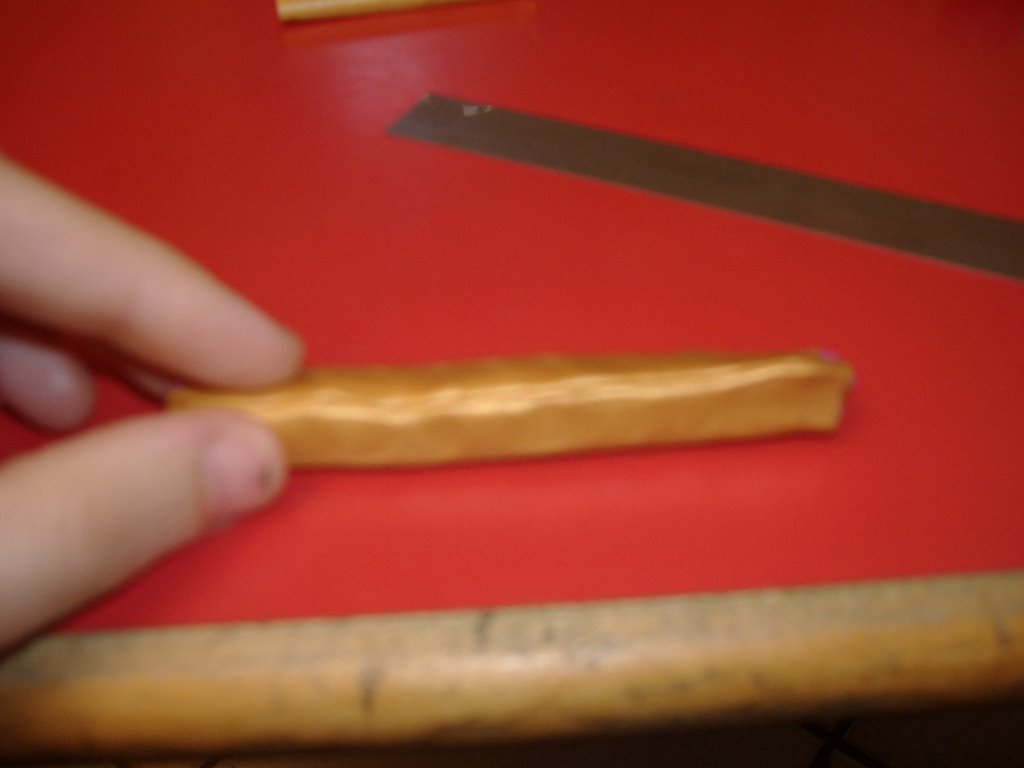 this shoud be your result.  Tropical Flower Tutorial Part 2Posted by Ari Farber
then by using your thumb and forefinger you squeeze the top side to look like this. preuzeto sa: fimocrazy.blogspot.com |
|||
|
|||
|
monna-1
Trajnica
Pridružen: 18 Travanj 2008 Lokacija: Croatia Status: Offline Bodovi: 2598 |
Opcije poruke
Hvala(0)
Citiranje Odgovor
Objavljeno: 11 Veljača 2009 u 21:37 |
||
 Decoupage glue dries to a clear glossy sheen that will protect your flowers for years to come. Decoupage glue dries to a clear glossy sheen that will protect your flowers for years to come.
You might remember the 70s as the decade of decoupage, but it's really an art that dates back to the 17th century. Back then it was known as poor man's art. Well, decoupage is back in vogue, and for gardeners it's a great way of using bits and pieces of your garden and turning them into art. The key to decoupage is layering. You can layer tissue paper, cards, photos and even dried flowers. You'll need a brush and decoupage finish (which you can purchase at a craft store). To decoupage on a picture frame, start by brushing on a thin layer of the decoupage finish. Then place dried flowers on top of the decoupage finish and pat them in place. Be sure the first layer of the finish is dry and then brush on another layer. Go over all parts of each flower with a nice thick coating. You'll want to layer the decoupage finish three more times, letting each coat dry in between. sa: www.hgtv.com |
|||
|
|||
|
monna-1
Trajnica
Pridružen: 18 Travanj 2008 Lokacija: Croatia Status: Offline Bodovi: 2598 |
Opcije poruke
Hvala(0)
Citiranje Odgovor
Objavljeno: 12 Veljača 2009 u 20:20 |
||
|
Decoupage link:
...a pogledajte ovo, kakvih divnih stvari, a i pribora!!!
|
|||
|
|||
|
monna-1
Trajnica
Pridružen: 18 Travanj 2008 Lokacija: Croatia Status: Offline Bodovi: 2598 |
Opcije poruke
Hvala(0)
Citiranje Odgovor
Objavljeno: 14 Veljača 2009 u 09:37 |
||
|
Ako ima zainteresiranih, mogu naručiti, ako ne, vrijedi pogledati!
|
|||
|
|||
|
monna-1
Trajnica
Pridružen: 18 Travanj 2008 Lokacija: Croatia Status: Offline Bodovi: 2598 |
Opcije poruke
Hvala(0)
Citiranje Odgovor
Objavljeno: 17 Veljača 2009 u 18:54 |
||
|
|||
|
monna-1
Trajnica
Pridružen: 18 Travanj 2008 Lokacija: Croatia Status: Offline Bodovi: 2598 |
Opcije poruke
Hvala(0)
Citiranje Odgovor
Objavljeno: 17 Veljača 2009 u 19:00 |
||
|
|||
|
monna-1
Trajnica
Pridružen: 18 Travanj 2008 Lokacija: Croatia Status: Offline Bodovi: 2598 |
Opcije poruke
Hvala(0)
Citiranje Odgovor
Objavljeno: 12 Ožujak 2009 u 20:01 |
||
CracklingThe only type of crackling I have been successful with is where the crackling medium is sandwiched between two colours of paint. I use the Duncan brand Quick Crackle.
Your crackles should be appearing and will continue to develop for about half an hour. This technique takes practice. I used to practice on cardboard until I felt confident to do an object. Practice with colour combinations. If you use black as a base and red or green as the top coat, the effect will be like leather. Another attractive combination is Iridescent Gold as the undercoat and Red (Naphthol Crimson + Cadmium Red) or Green (Hookers Green) as the topcoat. I have put a ruler beside the crackles in the photographs so you can see the difference in size.  These crackles were made by applying a base of Pale Gold. The crackle medium was applied with a foam brush in broad horizontal strokes. When the crackle medium was tacky I applied the top coat of Hookers Green with a foam brush in broad horizontal strokes. This is the result. |
|||
|
|||
|
monna-1
Trajnica
Pridružen: 18 Travanj 2008 Lokacija: Croatia Status: Offline Bodovi: 2598 |
Opcije poruke
Hvala(0)
Citiranje Odgovor
Objavljeno: 12 Ožujak 2009 u 20:07 |
||
 Tip of the monthWould you be delighted about greetings, handwritten with loving care? No matter whether on cardboard, stone, wood or vases & pots of terracotta – just confer a most individual touch on these objects and place brilliant accents The Art of Beautiful Writing. Antique effects with decoupage and crackle techniqueCut or tear out the design from the BRICO decoupage sheet (Still life orchid, B80710). Wet the backside a little bit, thus the paper can be placed on the item more easily. Apply ART POTCH Decoupage glue & lacquer to the back of the decoupage paper and put it on the chosen item. Particularly suitable: broad brushes (e.g. Hobby Line Basic Brush flat Art.-No. 722000, 723018 or 4924).
- sa stranice: c-kreul.de |
|||
|
|||
|
monna-1
Trajnica
Pridružen: 18 Travanj 2008 Lokacija: Croatia Status: Offline Bodovi: 2598 |
Opcije poruke
Hvala(0)
Citiranje Odgovor
Objavljeno: 12 Ožujak 2009 u 20:10 |
||
 Tip of the monthWould you be delighted about greetings, handwritten with loving care? No matter whether on cardboard, stone, wood or vases & pots of terracotta – just confer a most individual touch on these objects and place brilliant accents The Art of Beautiful Writing. Decorative Dishware with glitter effectsWith the Hobby Line Porcelain & Glass Pen Glitter 160° C, glitter-effects are now also available for glass and porcelain painting. Renewed lamps, mirrors, and tea lights shine colorfully and extravagantly, ordinary glasses are enhanced with amusing designs, vases and bowls shine with a cheerful mix of color. Step 1 Step 2
Material:Hobby Line Porcelain & Glass Pen Glitter Light Green (# 16509) |
|||
|
|||
|
monna-1
Trajnica
Pridružen: 18 Travanj 2008 Lokacija: Croatia Status: Offline Bodovi: 2598 |
Opcije poruke
Hvala(0)
Citiranje Odgovor
Objavljeno: 12 Ožujak 2009 u 20:14 |
||
Decoupage-techniqueCut or tear out the design from the BRICO decoupage sheet. Wet the backside a little bit, thus the paper can be placed on the item more easily. Apply ART POTCH Decoupage glue & lacquer to the back of the decoupage paper and put it on the chosen item. Particularly suitable: broad brushes (e.g. Hobby Line Basic Brush flat Art.-No. 722000, 723018 or 4924).
Tips
- sa stranice: c-kreul de |
|||
|
|||
|
monna-1
Trajnica
Pridružen: 18 Travanj 2008 Lokacija: Croatia Status: Offline Bodovi: 2598 |
Opcije poruke
Hvala(0)
Citiranje Odgovor
Objavljeno: 12 Ožujak 2009 u 20:40 |
||

Make a Super Easy Decoupage CandleAC.PL.bylineInvert = false; Event.observe(window, 'load', function(e){ Event.observe('byline', 'mouseover', AC.hoverByline); Event.observe('byline_bt', 'mouseover', AC.hoverByline); Event.observe('byline_container', 'mouseout', AC.hoverByline); });Decoupage is probably one of the easiest crafts to do. You can involve the kids. They love to paint on the glue. All you need is an item to decorate, some pretty paper such as decorative napkins or tissue paper, glue and a paintbrush. For the candle globe you can use one
Materials glass candle globe or holder colored tissue paper white glue such as Mod Podge scissors paintbrush Steps 1. Make sure the glass you choose is smooth. It can have curves or corners but not be rough to the touch. Clean and dry the globe. 2. Cut your paper into small pieces of different sizes and shapes. Using just three or four colors can give your project a mosaic look. 3. Apply glue in small areas with the brush. I use Mod Podge by Plaid but Aleene's makes one too. These glues are shinier than regular white glue which will give your project a more finished look. 4. Place a piece of paper over the glue. 5. Apply a thin layer of glue on the piece you just glued. 6. Apply glue as you go along and then another piece of paper overlapping the previous piece. 7. Repeat Step 6 until you have the area you want covered. 8. Apply a coat of glue over entire area of paper. 9. Allow to dry and repeat Step 8 if desired. More coats will give a more glossy appearance. 10. The globes I use have a neck and I tie ribbons, yarns and wire with beads to complete a boutique look. Now you have a great gift that was quick to do and easy on the pocketbook. Kids love to give them as gifts. Make sure the kids make "I did it!" cards so the recipient knows it's an extra special gift. Once you start making these you will not want to stop. It is a very addictive craft that is easy to do and easy on your wallet. You can also use this same technique to make faux stained-glass suncathers, christmas ornaments and decorative plates (not for eating off of). Note: Never leave a candle unattended when lit. Do not light candle until glue has dried for at least 24 hours. -sa stranice: Associated contend
|
|||
|
|||
|
Odgovori
|
Stranica 123> |
 Tweet
Tweet
|
| Pređi na drugi forum | Forumska ovlaštenja Vi ne možete objavljivati nove teme na ovom forumu Vi ne možete odgovarati na teme Vi ne možete brisati vaše poruke Vi ne možete urediti svoje poruke Vi ne možete dodati anketu Vi ne možete glasati u anketi |


 Opcije teme